Overview
This document will detail how to deploy ConnectWise RMM/ConnectWise Platform with ImmyBot.
Prerequisites
- An active ImmyBot subscription or trial
- Admin access to ConnectWise RMM
- Permissions in ImmyBot for managing Integrations and Deployments
Integration Capabilities
- Running scripts on the device
- Refreshing the agents’ connection status on-demand
- Importing agents from linked clients into ImmyBot
- Mapping clients from the integration to tenants in ImmyBot
- Getting an install token for a specific client
Process
Create the ConnectWise RMM API Credentials
-
Navigate to
Integrations->API Access. -
Click on
Generate API Access -
Provide an API Key Name and Description.
-
Select the following scopes:
Scope Needed for platform.automation.createstarting the ImmyBot ephemeral agent / running scripts platform.automation.readshellScripts template lookup platform.companies.readclient listing, company lookup platform.devices.readendpoint listing, heartbeat, and the install token platform.sites.readsite resolution needed to obtain install token -
Check the consent box
-
Click on
Generate API Access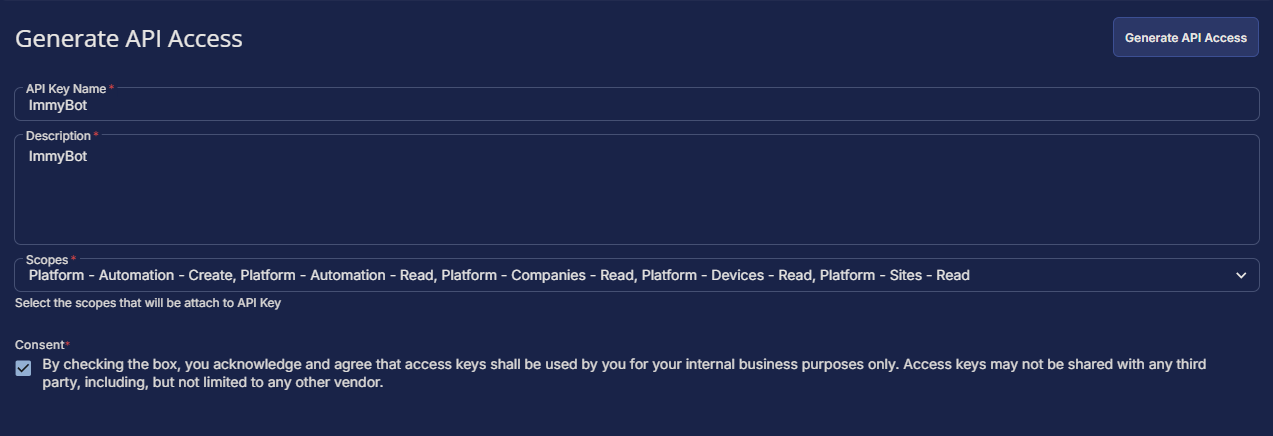
-
The API Key and the API Secret Key will be displayed. Make a note of these and the API URL somewhere safe, these will be needed for configuring the integration in ImmyBot.
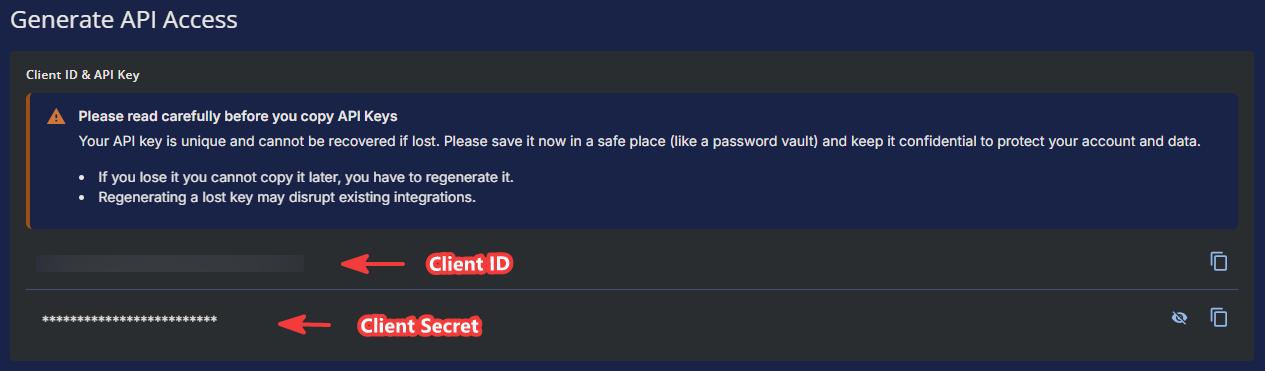
The API Secret Key will be hidden for security reasons after navigating away from this page. It will not be possible to retrieve it again. However, you can regenerate or delete API keys at any time by returning to the API Access page.
Set up the integration in ImmyBot
-
Navigate to
Show More->Integrations -
Click on
Add Integration -
Select
ConnectWise RMM -
Change the ApiEndpoint to your ConnectWise RMM region.
-
Update the ClientId and ClientSecret to use the ones you created in CW RMM.
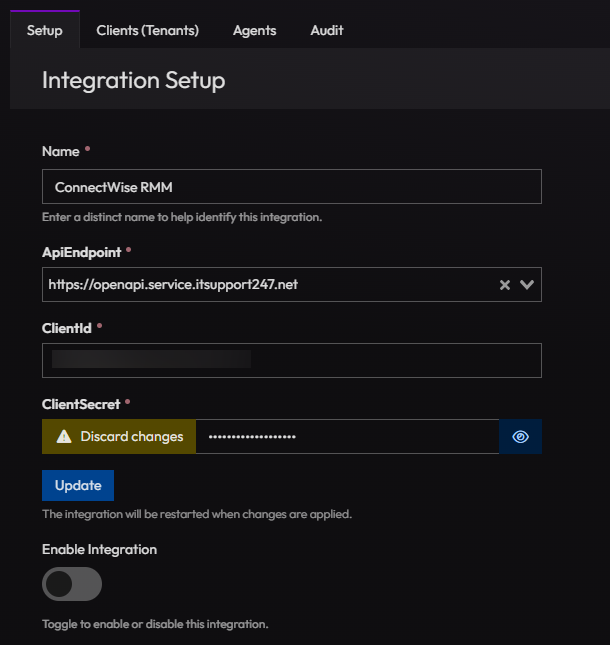
-
Click Update
-
Enable the integration
-
Link your clients in the client tab
Set up the Deployment
- Click on
Deploymentsand then Click onNew - Select
ConnectWise RMM - Integrationfrom the Software / Task drop down - Select the radio button labeled
Installedunder theSoftware should be - Select the
Latestradio button underDesired Version - Select the radio button labeled
RequiredunderTarget Enforcement - Select the radio button labeled
Cross TenantunderTarget Scope - Select the radio button labeled
All ComputerunderTarget Type - Select the radio button labeled
No FilterunderTarget Filter - Click on
Createto save your deployment.
Computers will be installed into the default site configured for a client.
Now the next time a session is run against a targeted computer, ConnectWise RMM will get installed.